# 前端博客(VuePress)
程序员一定要有自己的博客,哪怕是
生活博客。
# 一、介绍
VuePress 是尤雨溪发布的一个全新的基于 vue 的静态网站生成器,实际上就是一个 vue 的 spa 应用,内置 webpack,可以用来写文档。详见 VuePress中文网 (opens new window)。
**VuePress **由两部分组成:第一部分是一个极简静态网站生成器 (opens new window) (opens new window),它包含由 Vue 驱动的主题系统 (opens new window)和插件 API (opens new window),另一个部分是为书写技术文档而优化的默认主题 (opens new window),它的诞生初衷是为了支持 Vue 及其子项目的文档需求。
VuePress 有很多优点:
- 界面简洁优雅(个人感觉比 HEXO 好看)
- 容易上手(半小时能搭好整个项目)
- 更好的兼容、扩展 Markdown 语法
- 响应式布局,PC端、手机端
# 二、开始创建
创建博客文件
创建blog文件夹,也可以使用 mkdir 命令新建
mkdir blog1本地安装VuePress
npm install -D vuepress1初始化项目
进入blog文件夹,使用
npm init或npm init -y(默认yes)npm init1初始化完成,会生成
package.json文件。创建配置文件和文件夹
(1)创建文件夹
.vuepress(2)进入
.vuepress文件夹,创建public文件夹,创建config.js文件至此文件结构为:
blog
├───.vuepress
│     ├── public		// 静态资源文件
│     └── config.js		// 博客首页
└── package.json
1
2
3
4
5创建首页
创建
index.md首页文件。--- home: true heroImage: /assets/images/logo.png heroText: 博客标题 tagline: 博客副标题 actionText: 快速阅读 actionLink: /vue/scrollNumberTop features: - title: 主页 details: 以 Markdown 为中心的项目结构,以最少的配置帮助你专注于写作。 - title: Vue插件 details: Mischieff为你提供Vue组件,让你的项目炫炫炫!!! - title: 其他 details: Mischieff为你提供一起适配方式及解决方案,没错还是让你爽到爆。 footer: Mischieff 前端菜鸟提供 ---1
2
3
4
5
6
7
8
9
10
11
12
13
14
15
16配置后,第9步运行完成,对应的首页渲染效果为:

创建网页文件(根据所需,自由创建)
创建
doc文件夹,创建页面文件analysis.md至此文件结构为:
blog
├───.vuepress
│	├── public		 // 静态资源文件
│	└── config.js	  // 博客首页
├───doc				// 文档
│	└── analysis.md	  // 分析交流会页面
└── package.json
1
2
3
4
5
6
7config.js文件配置
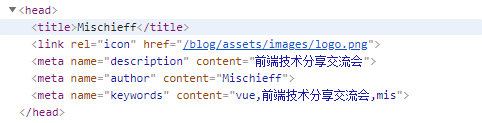
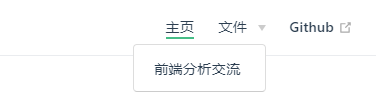
进入
.vuepress/config.js,配置config.js文件module.exports = { title: 'Mischieff', base: '/blog/', description: '前端技术分享交流会', head: [ [ 'link', { rel: 'icon', href: '/assets/images/logo.png', }, ], // 增加一个自定义的 favicon(网页标签的图标) [ 'meta', { name: 'author', content: 'Mischieff', }, ], // 作者 [ 'meta', { name: 'keywords', content: 'vue,前端技术分享交流会,mis', }, ], // 关键词 ], markdown: { lineNumbers: true, // 代码块显示行号 }, host: 'localhost', // ip port: 8098, // 端口 evergreen: true, // 浏览器兼容性 // 使用的主题 themeConfig: { logo: '/assets/images/logo.png', sidebar: 'auto', // 按照md标题,自动生成侧边栏 lastUpdated: '更新时间', // 更新时间 nav: [ { text: '主页', link: '/', }, { text: '文件', items: [ { text: '前端分析交流', link: '/doc/analysis', }, { text: 'Emoji 表情', link: '/doc/emoji', }, ], }, { text: 'Github', link: 'https://github.com/mischieff', }, ], sidebar: { '/doc/': [ { title: '文件', collapsable: false, children: [ { title: '前端分析交流', path: '/doc/analysis', }, { title: 'Emoji 表情', path: '/doc/emoji', }, ], }, ], }, }, plugins: [ [ '@vuepress/last-updated', { transformer: (timestamp, lang) => { // 页面底部更新时间格式化 // 不要忘了安装 :npm install moment const moment = require('moment'); moment.locale('zh-cn'); return moment(timestamp).format('LLL'); }, }, ], ], };1
2
3
4
5
6
7
8
9
10
11
12
13
14
15
16
17
18
19
20
21
22
23
24
25
26
27
28
29
30
31
32
33
34
35
36
37
38
39
40
41
42
43
44
45
46
47
48
49
50
51
52
53
54
55
56
57
58
59
60
61
62
63
64
65
66
67
68
69
70
71
72
73
74
75
76
77
78
79
80
81
82
83
84
85
86
87
88
89
90
91
92
93
94
95配置后,第9步运行完成,对应的head渲染效果为:
配置后,第9步运行完成,对应的导航菜单渲染效果为:
配置package.json
进入
package.json,配置scripts启动文件。"scripts": { "dev": "vuepress dev", "build": "vuepress build", "deploy": "bash deploy.sh" },1
2
3
4
5启动博客
启动博客,浏览器查看
http://localhost:8080/blog/。npm run dev1
# 三、部署
现在我们要把本地的内容推送到某个服务器上,这样只要有网络,就可以随时随地看自己的网站了。一般来说,有两种方案可供选择:
自己买一个服务器,阿里云、腾讯云等,这种方式的好处是速度有保证、可以被搜索引擎收录。
使用 Github Pages (opens new window) 。简单说就是
Github提供的,用于搭建个人网站的静态站点托管服务。很多人用它搭建个人博客。这种方式的好处是免费、方便,坏处是速度可能会有些慢、不能被国内的搜索引擎收录。
下面将给大家讲解如何使用 Github Pages服务。
登录Github
登录自己的Github,点击如图所示
新建按钮,或者点击右上角+按钮进行新建。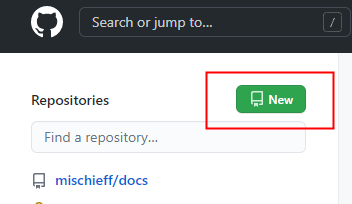
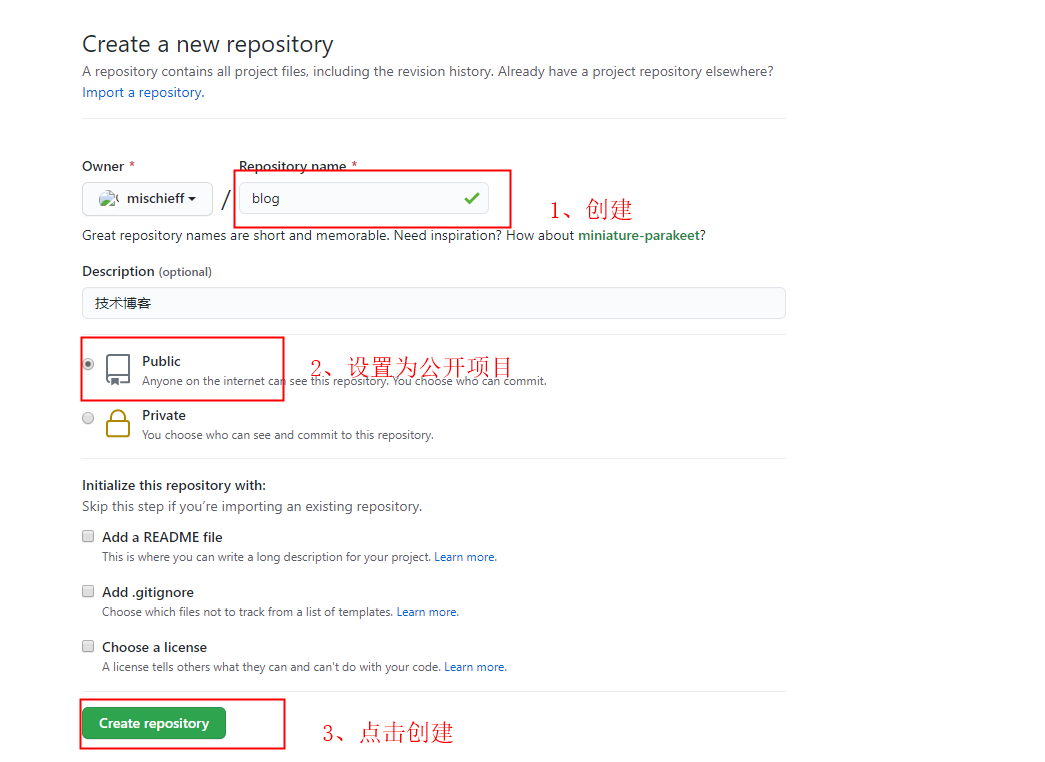
创建项目
填写如图所示资料,点击创建。
注意:
创建的项目名和文件名一致
创建git忽略文件 `
创建
.gitignore文件。内容如下node_modules/ .vuepress/dist1
2上传文件
上传文件至
Github上,命令如下:
 git add .
 git commit -m "提交内容"
 git push -u origin master
2
3
- 创建应用脚本文件
创建应用脚本文件
deploy.sh。
# 确保脚本抛出遇到的错误
set -e

# 生成静态文件
npm run build

# 进入生成的文件夹
cd .vuepress/dist

git init
git add -A
git commit -m 'deploy'

# 如果发布到 https://<USERNAME>.github.iyarn docs:devo
# git push -f git@github.com:mischieff/blog.github.io.git master

# 如果发布到 https://<USERNAME>.github.io/<REPO>
git push -f git@github.com:mischieff/blog.git master:gh-pages

cd -
2
3
4
5
6
7
8
9
10
11
12
13
14
15
16
17
18
19
20
- 部署
运行deploy命令进行上传部署。
npm run deploy
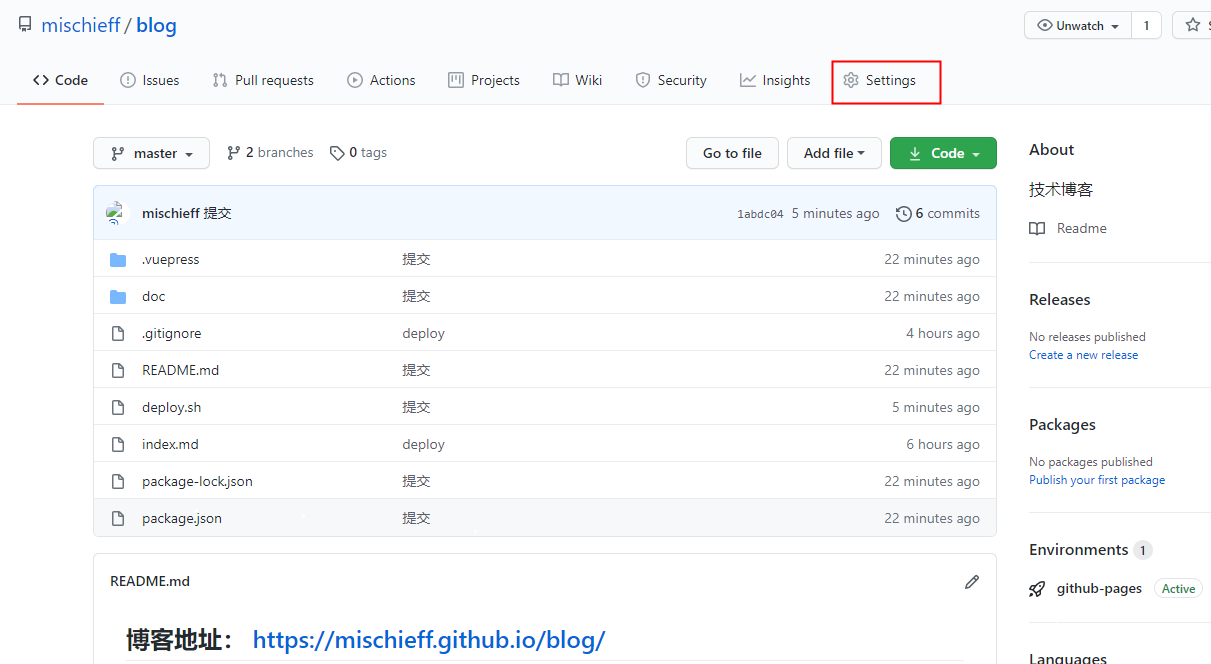
- 查看部署配置确保运行
打开Git,进入刚上传的目录中,点击
Settings进行配置。
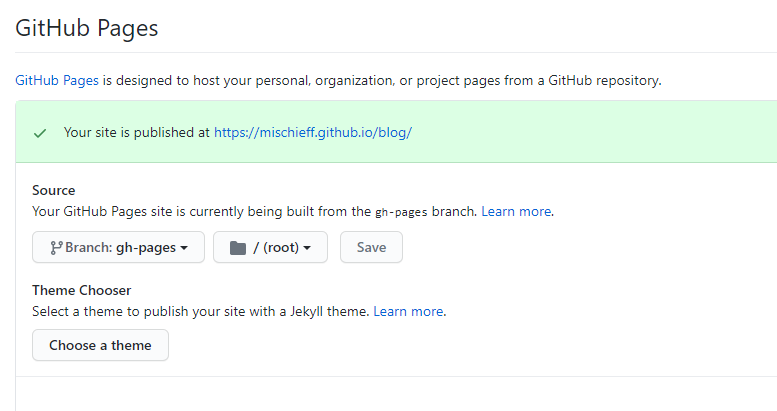
在
Options,设置Source,确保切换在gh-pages分支上。当出现如图所示绿勾时 ✔️ 说明部署成功。
- 完成部署
此刻就可以进入自己的博客**
https://mischieff.github.io/blog/**,尽情的欣赏自己的作品吧!!!

# 四、其他
图片
图片文件夹路径
.vuepress/public/一般创建images文件夹更改路径
/blog/assets/images/1配置颜色及样式
在
.vuepress/styles/palette.创建主题文件,修改主题配置文件。
/*********************************** 全局配置 ***************************************/
// 颜色
$accentColor = #42b983  // 默认主题颜色
$textColor = #2c3e50    // 默认字体颜色
$borderColor = #eaecef  // 默认边框颜色
$codeBgColor = #f9f9f9  // 默认代码背景颜色
$arrowBgColor = #ccc    // 默认箭头颜色
$badgeTipColor = #42b983
$badgeWarningColor = darken(#ffe564, 35%)
$badgeErrorColor = #DA5961

// 布局
$navbarHeight = 3.6rem  // 默认导航高度
$sidebarWidth = 20rem   // 默认左侧导航宽度
$contentWidth = 760px   // 默认详情页宽度
$homePageWidth = 960px  // 默认首页宽度

// 响应式变化点
$MQNarrow = 959px
$MQMobile = 719px
$MQMobileNarrow = 419px
/*********************************** 更改样式 ***************************************/
// 标注
   blockquote{
       border-left: 4px solid #42b983;
       padding: 10px 15px;
       color: #777;
       font-size: 15px;
       background-color: rgba(66, 185, 131, .1);
       code{
           margin: 0 2px!important;
           padding: 2px 4px!important;
           border-radius: 2px!important;
           font-family: Roboto Mono, Source Sans Pro, Monaco, courier, monospace !important;
           font-size: 0.92rem!important;
           color: #e96900!important;
           background-color: #f8f8f8!important;
       }
   }

   // 代码块
   div[class*="language-"].line-numbers-mode::after{
       border:none;
   }
   div[class*="language-"].line-numbers-mode .line-numbers-wrapper{
       color:#999;
   }
   .theme-default-content pre code, .theme-default-content pre[class*="language-"] code{
       color:#f08d49;
   }

   li{
       font-size:15px;
   }
2
3
4
5
6
7
8
9
10
11
12
13
14
15
16
17
18
19
20
21
22
23
24
25
26
27
28
29
30
31
32
33
34
35
36
37
38
39
40
41
42
43
44
45
46
47
48
49
50
51
52
53
54
- 更换主题
以阿里的
AntDocs为例,确保vuepress为本地安装。首先安装
vuepress-theme-antdocs主题
// 安装主题
npm i vuepress-theme-antdocs
2
打开
.vuepress/config.js文件,然后在合适位置引用它。
  module.exports = {
     ...
     theme: 'antdocs',
     ...
   }
2
3
4
5
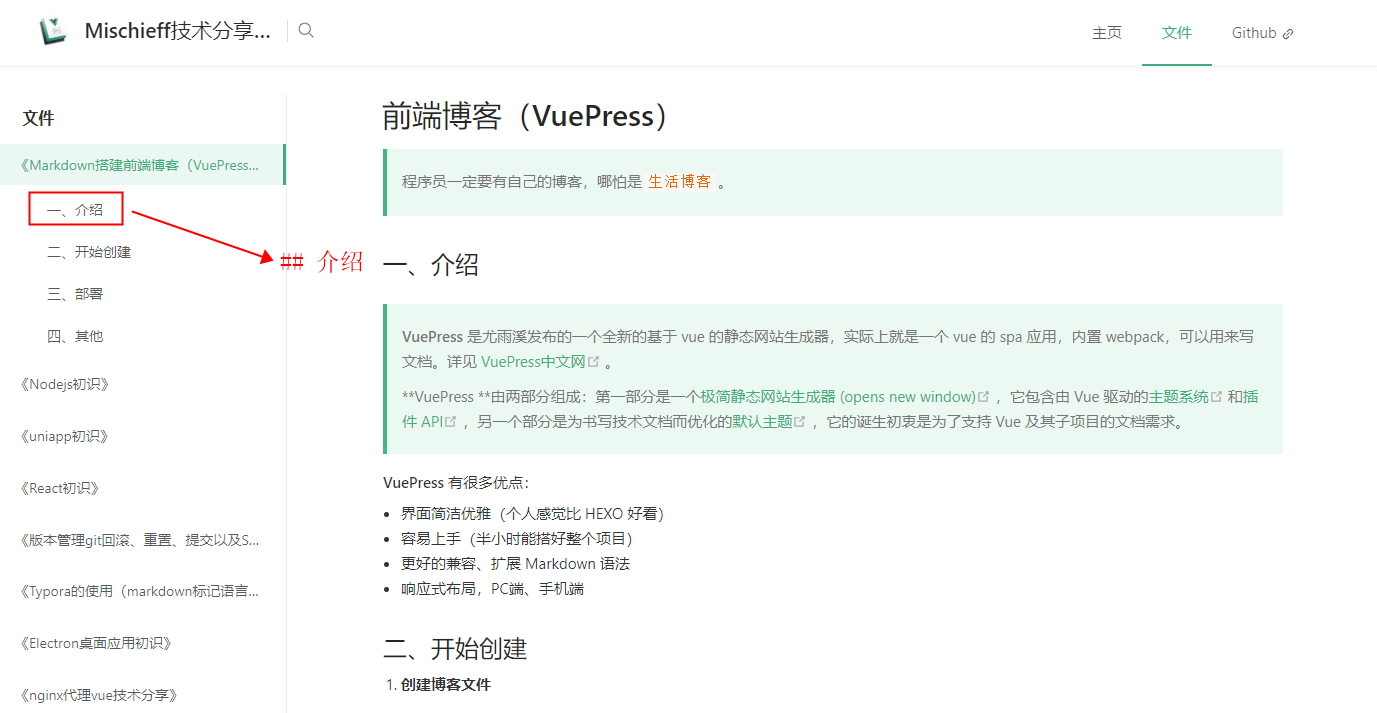
vuePress二级目录
详情页右侧二级目录,只能显示Markdown中的二级标签,即
##两个井号的目录